During the last few weekends Jorge L., Luis Viola and I (Alain Mouette) were working in the Lab finishing the assembly of the Heated Bed among other things.

- Measurements that we made
The measurements had already been made and are documented in 11/julho Blog . I am repeating here the important results:
- Dimensions: 145 x 196 x 5 mm aluminum
- First, we connected it to a smaller Power Supply that only provided 3A and 7.1 V (with smaller resistors) the temperature stabilized at 58.5°C at 20°C ambient temperature. So we have a dissipation constant (58,5-20)/(3*7.1) = 1.8°C/Watt.
- To achieve higher temperatures, 110°C or more, as Nophead is using , we will need (110°C-15°C)*1.8 = 52W only for losses to the environment.
- Heating rate: we let it cool down and fed it with a bigger Power Supply, with 50W. It warmed up from 24°C to 52.5°C in 410s ie: (53.5-24)/410 = 0.07 ° C / sec.
- We designed a total power of 150 watts, it should be ok for a PC power supply.
- Assembly
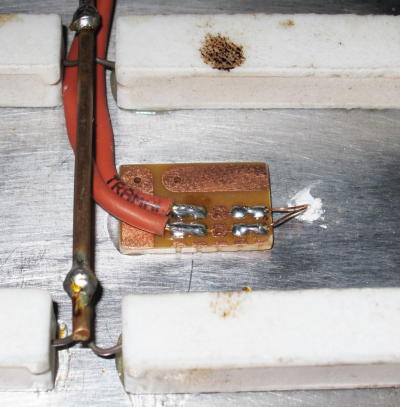
 The test resistors were replaced with larger resistors. Each resistor is 10 Watts (cost $1.00), glued to the table below with epoxy adhesive (Araldite). Each of 6R8 with 12 Volts dissipates around 20W, being fixed in a huge heatsink, they can function properly.
The total power of 150 Watts achieves 60°C in 3 minutes and 110°C in 5 minutes. After heating consumes approx. 50W to maintain 110°C.
The plate is glued with epoxy adhesive. Jorge made a small blind hole filled with thermal paste where the sensor was
inserted.
We used the Murata Thermistor 100k 1% found at Mouser for $ 0.79 .
- Electronics

I have used a TC4427 driver because the MOSFET is driven under 12V, it was found at Farnell.
(Click to enlarge the schematic)

As we are using a PC PSU, I used the 4 wire 12V connector that goes to the motherboard.
The heatsink is 25°C/W a little too small. The MOSFET voltage drop (Rdson=17mOhms) was measured as 0.2 V generating 2.5 W during cold-start.

According to the datasheet, the thermal resistance should be 15°C/W.

- Problems and Solutions
One problem that we had was that the Power Supply exploded! This is literally speaking, it was an unbranded PSU that had already provided many years of good service but a real load of 150W was more then it could take. Fortunately, Jorge found a similar PSU from Dell with the same specifications and is now working perfectly.
We aim to make another version powered directly from 110/220V AC power. This is more worrisome and for security reasons, I personally think it can be done on a glass plate instead of aluminum.
The functional outcome was very good, we did a lot of printing at 120 ° C and warping previously found almost completely disappeared. We still need tp test with larger pieces, will will see how it behaves in the future.